CCI measures the current price level relative to an average price level over a given period of time.
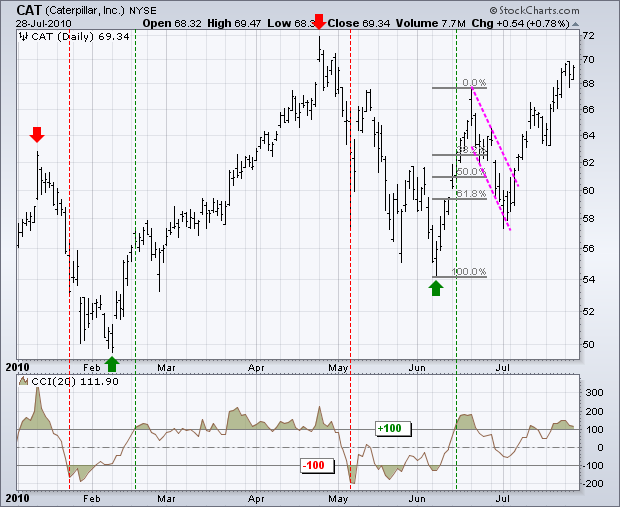
There were four trend signals within a seven-month period. Obviously, a 20-day CCI is not suited for long-term signals; chartists should use weekly or monthly charts for those. The stock peaked on 11-Jan and turned down. CCI moved below -100 on 22-January (8 days later) to signal the start of an extended move. Similarly, the stock bottomed on 8-February and CCI moved above +100 on 17-February (6 days later) to signal the start of an extended advance. CCI does not catch the exact top or bottom, but it can help filter out insignificant moves and focus on the larger trend.
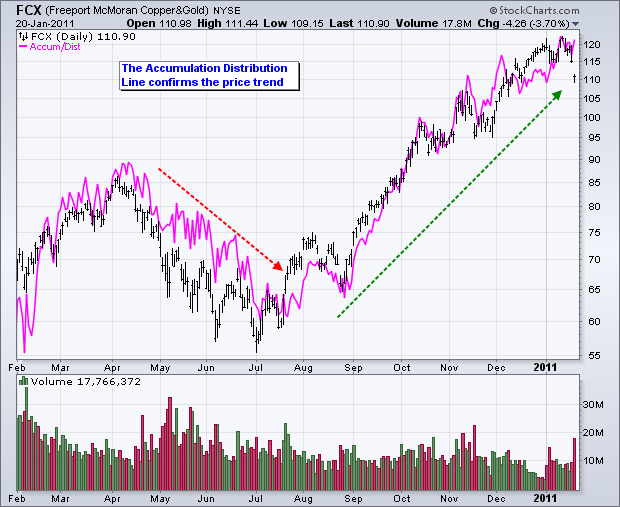
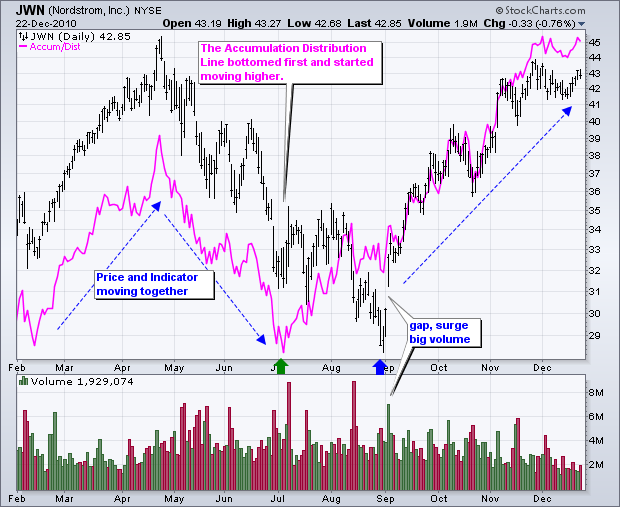
egardless of how CCI is used, chartists should use CCI in conjunction with other indicators or price analysis. Another momentum oscillator would be redundant, but On Balance Volume (OBV) or the Accumulation Distribution Line can add value to CCI signals.
CCI measures the difference between a security's price change and its average price change. High positive readings indicate that prices are well above their average, which is a show of strength. Low negative readings indicate that prices are well below their average, which is a show of weakness.
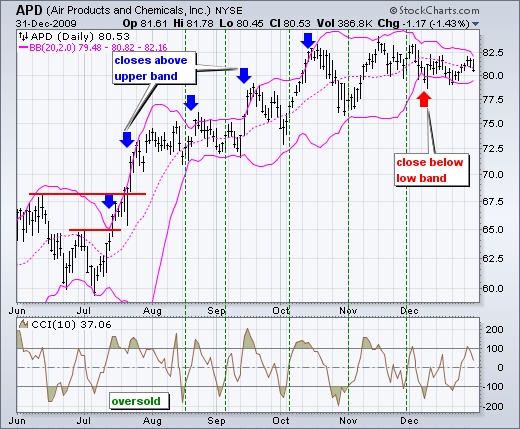
The Commodity Channel Index (CCI) can be used as either a coincident or leading indicator. As a coincident indicator, surges above +100 reflect strong price action that can signal the start of an uptrend. Plunges below -100 reflect weak price action that can signal the start of a downtrend.
As a leading indicator, chartists can look for overbought or oversold conditions that may foreshadow a mean reversion. Similarly, bullish and bearish divergences can be used to detect early momentum shifts and anticipate trend reversals.
There were four trend signals within a seven-month period. Obviously, a 20-day CCI is not suited for long-term signals; chartists should use weekly or monthly charts for those. The stock peaked on 11-Jan and turned down. CCI moved below -100 on 22-January (8 days later) to signal the start of an extended move. Similarly, the stock bottomed on 8-February and CCI moved above +100 on 17-February (6 days later) to signal the start of an extended advance. CCI does not catch the exact top or bottom, but it can help filter out insignificant moves and focus on the larger trend.
Overbought/Oversold
Identifying overbought and oversold levels can be tricky with the Commodity Channel Index (CCI), or any other momentum oscillator for that matter. First, CCI is an unbound oscillator. Theoretically, there are no upside or downside limits. This makes an overbought or oversold assessment subjective. Second, securities can continue moving higher after an indicator becomes overbought. Likewise, securities can continue moving lower after an indicator becomes oversold.
The definition of overbought or oversold varies for the Commodity Channel Index (CCI). ±100 may work in a trading range, but more extreme levels are needed for other situations. ±200 is a much harder level to reach and more representative of a true extreme. Selection of overbought/oversold levels also depends on the volatility of the underlying security. The CCI range for an index ETF, such as SPY, will usually be smaller than for most stocks, such as Google.
Bullish/Bearish Divergences
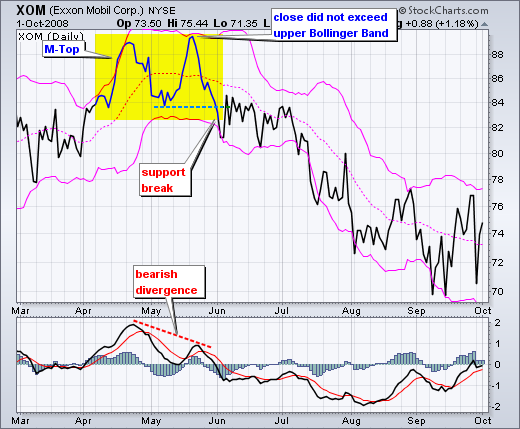
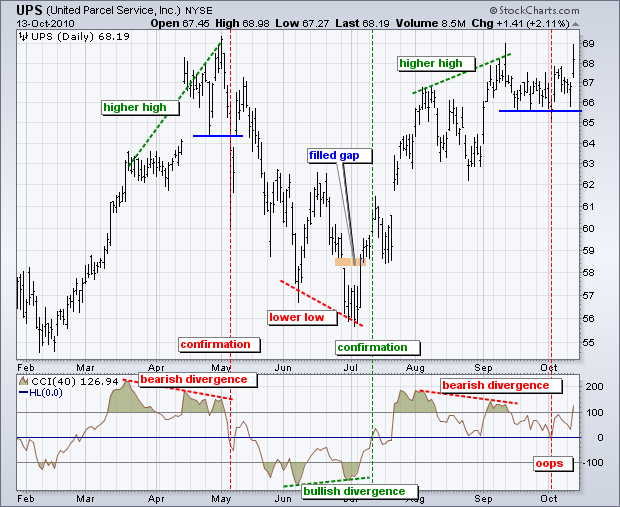
Divergences signal a potential reversal point because directional momentum does not confirm price. A bullish divergence occurs when the underlying security makes a lower low and CCI forms a higher low, which shows less downside momentum. A bearish divergence forms when the security records a higher high and CCI forms a lower high, which shows less upside momentum. Before getting too excited about divergences as great reversal indicators, note that divergences can be misleading in a strong trend. A strong uptrend can show numerous bearish divergences before a top actually materializes. Conversely, bullish divergences often appear in extended downtrends.
Confirmation holds the key to divergences. While divergences reflect a change in momentum that can foreshadow a trend reversal, chartists should set a confirmation point for CCI or the price chart. A bearish divergence can be confirmed with a break below zero in CCI or a support break on the price chart. Conversely, a bullish divergence can be confirmed with a break above zero in CCI or a resistance break on the price chart.
egardless of how CCI is used, chartists should use CCI in conjunction with other indicators or price analysis. Another momentum oscillator would be redundant, but On Balance Volume (OBV) or the Accumulation Distribution Line can add value to CCI signals.